Update calendar
The calendar defines the time blocks that structure your schedule. These blocks—called periods—determine how the schedule is divided for planning, reporting, and execution. A period can represent a shift, a day, a week, or any custom duration, depending on the level of detail you need.
A site’s calendar is important because it:
-
Controls the scheduling horizon by defining how far ahead you can plan.
-
Determines reporting granularity: shift-level calendars allow detail reporting (e.g., tonnes per shift), while daily or weekly calendars provide a higher-level view.
-
Affects calendar fields: time-based fields—such as resource time usage models, production rates, and objectives—are defined per period. These values you set for these fields apply uniformly across the entire period.
If today is August 2, 2026, and you’re scheduling the next two weeks, the calendar should span from August 2 to August 16, 2026. At this short horizon, calendars typically report at the Shift level, where each period could represent a 12-hour working block.
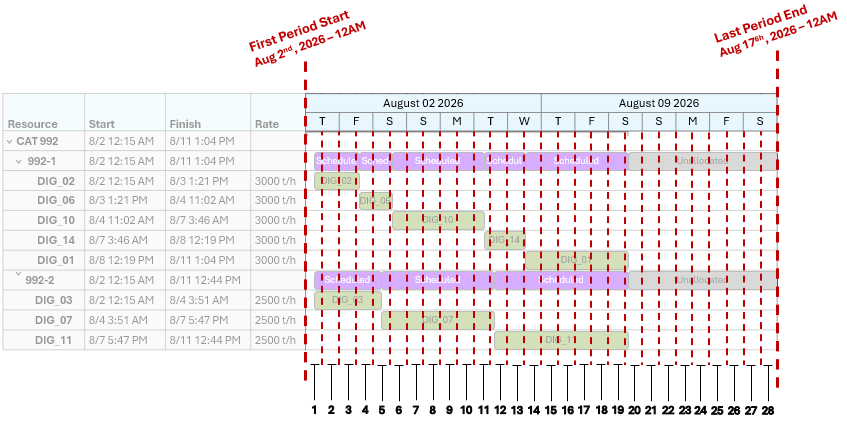
This illustration uses a simplified Gantt chart view to show how the calendar controls the scheduling timeline. The timeline begins from the first period (August 2 2026, 12PM) until the end of the last period (August 17 2026, 12AM). The calendar breaks time into 12-hour periods, representing shifts. These segments/periods are illustrated and labelled.
|
Resource |
Activity Area |
|
Period |
Period Start |
SH013 |
SH014 |
|||
|
DIG_02 |
DIG_06 |
DIG_10 |
DIG_03 |
DIG_07 |
||
|
Shift-1 |
8/2/2026 6:00 AM |
30,000.00 |
|
|
20,160.00 |
|
|
Shift-2 |
8/2/2026 6:00 PM |
30,000.00 |
|
|
27,360.00 |
|
|
Shift-3 |
8/3/2026 6:00 AM |
21,111.75 |
8,888.25 |
|
23,040.00 |
|
|
Shift-4 |
8/3/2026 6:00 PM |
|
30,000.00 |
|
28,800.00 |
|
|
Shift-5 |
8/4/2026 6:00 AM |
|
7,568.45 |
22,387.20 |
8,204.82 |
20,567.78 |
|
Shift-6 |
8/4/2026 6:00 PM |
|
|
30,000.00 |
|
28,800.00 |
|
Shift-7 |
8/5/2026 6:00 AM |
|
|
30,000.00 |
|
28,800.00 |
|
Shift-8 |
8/5/2026 6:00 PM |
|
|
30,000.00 |
|
28,800.00 |
|
Shift-9 |
8/6/2026 6:00 AM |
|
|
30,000.00 |
|
28,800.00 |
|
Shift-10 |
8/6/2026 6:00 PM |
|
|
5,348.10 |
|
16,426.72 |
This simple pivot table reports at the shift level, for the first ten periods, showing the number of tonnes each resource mines across each allocated activity area. If the period level was Day, it would reflect the number of tonnes mined in each day in each activity area.
Calendar periods
The calendar defines the start and end of each period, which is a block of time used for planning and reporting. A period could represent:
-
A shift (e.g., 12 hours)
-
A day
-
A week
-
Or a custom duration, depending on the level of detail your operation requires.
The length of each period directly affects:
-
Reporting granularity, determining how production and performance metrics are aggregated.
-
Operational responsiveness – shorter periods make it easier to adjust plans in response to real-time changes.
Smaller periods (e.g., 12-hour shifts)
Smaller periods provide greater control and visibility. For example, using shift-based periods allows you to track:
-
Tonnes mined by a specific resource within the shift
-
Distance travelled by equipment during the shift
-
Total material extracted from a pit during that period
This level of detail is critical for:
-
Short-term planning horizons (daily or shift-based)
-
High-precision operations where equipment utilisation and compliance to targets must be monitored closely
|
Period |
Period Start |
SH013 |
SH014 |
|||
|
DIG_02 |
DIG_06 |
DIG_10 |
DIG_03 |
DIG_07 |
||
|
Day-1 |
8/2/2026 6:00 AM |
60,000.00 |
|
|
47,520.00 |
|
|
Day-2 |
8/3/2026 6:00 AM |
21,111.75 |
38,888.25 |
|
51,840.00 |
|
|
Day-3 |
8/4/2026 6:00 AM |
|
7,568.45 |
52,387.20 |
8,204.82 |
49,367.78 |
|
Day-4 |
8/5/2026 6:00 AM |
|
|
60,000.00 |
|
57,600.00 |
|
Day-5 |
8/6/2026 6:00 AM |
|
|
35,348.10 |
|
45,226.72 |
This simple pivot table reports the same schedule from the previous table, except now the periods occur at the Day level (24hrs per period). In this case, each period represents two shifts. The scheduling data from two shifts is aggregated into a Day.
|
Field |
Shift1 |
Shift2 |
Shift3 |
Shift4 |
Shift5 |
Shift6 |
Shift7 |
|
PH2800 |
|||||||
|
|
|||||||
|
Availability |
100% |
75% |
100% |
70% |
100% |
70% |
70% |
|
Utilisation |
90% |
90% |
95% |
95% |
90% |
90% |
95% |
|
Efficiency |
100% |
100% |
100% |
100% |
100% |
100% |
100% |
|
Rate Factor |
100% |
105% |
105% |
100% |
100% |
95% |
90% |
 SH013
SH013This simplified view of resource time usage models shows how the factors are applied per period
Larger periods (e.g., weekly)
Larger periods simplify:
-
Calendar setup: Fewer periods to manage
-
Reporting: Aggregated data for high-level analysis
However, they reduce:
-
Detail in scheduling: You cannot see intra-week variations in resource performance or material movement.
-
Responsiveness: Adjusting for unexpected events (e.g., equipment breakdowns) becomes harder because the schedule is locked into longer blocks.
When to use larger periods:
-
For medium-term planning horizons (e.g., 4-12 weeks)
-
When the focus is on strategic alignment rather than operational detail
-
For summary reporting to management or external stakeholders
Frequency of updating calendar
You should update the calendar frequently to keep the schedule rolling forward. When real-world time has moved past the earliest periods in the schedule, those periods should be removed and new periods should be added.
Updating the calendar involves:
-
Removing past periods so the schedule reflects the current date.
-
Adding new periods to maintain your planning horizon.
As a guideline:
-
If you plan at a shift or day level, you’ll update more often.
-
If you plan at a weekly level, updates will be less frequent.
Keeping the calendar current ensures the schedule stays aligned with reality and reports remain accurate.
How to update the calendar
There are two ways to update the calendar:
-
Set up and import an updated calendar *.csv.
-
Select a new Schedule Start Date.
New calendar file
Update the current calendar file, removing occurred dates and adding new dates within the scheduling horizon, to reflect the current operational reality. Afterwards, import the calendar.
To update the calendar with a new file
-
Open Config, on your site's tile click Edit
 , then go to General and Calendar Settings
  .
. -
Review the current calendar, and determine whether it needs to be updated.
Refer to Frequency of updating calendar above.
-
Prepare a *.csv file, following the required structure, with the up-to-date period names and lengths.
Refer to Creating a calendar below.
-
Use Import Calendar
 to import the new calendar.
 -
Validate the new calendar in the calendar preview.
Select a new schedule start date
You can roll the schedule forward by specifying a new schedule start date. In this case, the schedule and its tasks will begin from this date.
Keep in mind that you can only select dates within the current calendar’s scheduling horizon. If you roll the date forward, it won’t extend the calendar. To roll the calendar forward and move the scheduling horizon forward, you’ll need to import a new calendar.
To update the calendar
-
Open Config, on your site’s tile click Edit
, then go to General and Calendar Settings. -
Review the current calendar, and determine whether it needs to be updated.
Refer to Frequency of updating calendar above.
-
Set Schedule Start to a new period within the current calendar’s horizon.
Validate the updated calendar
After importing a new calendar, it’s essential to confirm that the changes are correct and that the schedule still behaves as expected. This step ensures that period definitions, time-based inputs, and reporting structures remain accurate and that the schedule continues to reflect operational reality.
Review the calendar preview
Start by checking the Calendar Preview in the calendar configuration This view shows how XECUTE interpreted your imported file. Confirm that:
-
Period names match your intended naming convention.
-
Start and end dates align with your planning horizon.
-
Period lengths are correct and consistent.
If you see unexpected names, durations, or gaps, the issue is likely in the CSV file. Correct the file and re-import the calendar.
Understand the impact of period changes
Changing the calendar structure affects the timeline and influences reporting, time-based inputs, and scheduling behaviour.
Changed period lengths
Affected reports
If you’ve shortened or lengthened periods, this will alter the granularity of reports. For example, a longer first period will aggregate more data, which can affect how production and compliance are reported.
Check how reports your reports (pivot tables, reporting Gantts, automatic reports) have recalculated the scheduling data.
Time-based inputs
Time-based inputs, such as calendar field values and resource time usage fields, are automatically recalculated pro rata to match the new period lengths. This ensures values remain proportional to the original configuration. For example, if a monthly period becomes weekly, the original monthly values are distributed across the new weeks.
For an example of how calendar period data is recalculated when you change period lengths, refer to Auto-update calendar fields.
Changed time span
If you’ve extended the overall calendar beyond the original scheduling horizon, new periods (date ranges) may have blank values for time-based fields (e.g., stockpile reclaim rates, resource time usage).
Validate in Client
Once the calendar is updated, open the Gantt chart in Client and confirm that the schedule still runs correctly:
-
The schedule should now start from the new Schedule Start period.
-
Task order and dependencies should be the same.
-
If you rolled the calendar forward, you’ll still need to update mined-out areas. If not, the schedule may still include old work in the new horizon. Refer to Update Mining Progress for guidance.
Watch for milestone tasks: If tasks now fall outside the new horizon, they appear as milestone icons at the end of the Gantt chart. These tasks won’t be scheduled but remain visible for reference.
Play the schedule animation to confirm the timing still make sense in the updated horizon.
Check time-based inputs
Review time-based inputs like resource time usage fields and calendar fields (stockpile reclaim rates, crusher rates, custom calendar field values…):
-
Ensure that recalculated values make sense for the new periods.
-
Look for blank values in new periods and fill them in if required.
-
Confirm that any external feeds or overrides still apply correctly.
Key considerations
-
Rolling forward the calendar does not automatically adjust activity areas. If you’ve moved the schedule start date, ensure that mined-out areas are trimmed or converted to reflect actual progress.
-
Tasks beyond the new horizon are not lost: they remain as milestones for reference but are excluded from scheduling calculations.
-
External data feeds (e.g., for calendar fields) should be checked to confirm that values align with the new periods.
Default calendar
When you create a new site, XECUTE automatically generates a default calendar to provide a ready-to-use structure for short-term scheduling. This default calendar includes:
-
70 periods in total
-
Each day split into two 12-hour shifts:
-
DayShift
-
NightShift
-
-
The first period begins at the start of the next week (Sunday) from today’s date
-
Covers a 5-week scheduling horizon
This default setup ensures you can start scheduling immediately without creating a custom calendar. It is particularly useful for short-term planning scenarios where shift-level detail is required.
Creating a calendar
You can configure a calendar to suit your operational needs.
Mixed-length calendar
A calendar isn’t limited to fixed-length periods. They can be of any duration, and their length can vary over time. This flexibility allows you to align the calendar with your planning horizon and operational requirements.
A mixed-length calendar is useful:
-
To match site-specific planning practices (e.g., shift-based for short-term, weekly for medium-term).
-
To transition between levels of detail as the schedule progresses (e.g., start with daily shifts, then move to weekly or monthly periods for longer horizons).
-
To reflect operational changes, such as moving from intensive short-term planning to broader strategic planning.
Example: mixed-length periods
The table below shows a simple custom calendar with 10 periods.
-
The first 8 periods alternate between DayShift and NightShift, each lasting 12 hours.
-
The final two periods are labelled Day and span 24 hours each.
|
Period Number |
Period Name |
Period Start |
Period End |
|---|---|---|---|
|
1 |
DayShift |
07/08/2026 06:00 AM |
07/08/2026 06:00 PM |
|
2 |
NightShift |
07/08/2026 06:00 PM |
08/08/2026 06:00 AM |
|
3 |
DayShift |
08/08/2026 06:00 AM |
08/08/2026 06:00 PM |
|
4 |
NightShift |
08/08/2026 06:00 PM |
09/08/2026 06:00 AM |
|
5 |
DayShift |
09/08/2026 06:00 AM |
09/08/2026 06:00 PM |
|
6 |
NightShift |
09/08/2026 06:00 PM |
10/08/2026 06:00 AM |
|
7 |
DayShift |
10/08/2026 06:00 AM |
10/08/2026 06:00 PM |
|
8 |
NightShift |
10/08/2026 06:00 PM |
11/08/2026 06:00 AM |
|
9 |
Day |
11/08/2026 06:00 AM |
12/08/2026 06:00 AM |
|
10 |
Day |
12/08/2026 06:00 AM |
13/08/2026 06:00 AM |
Create a calendar
To create a calendar, make a CSV file with two columns. The columns must be in this order and have these column names:
-
Period Name: A label for the period (e.g., DayShift or Week1)
-
Start Date: The start date and time of the period
A CSV file for the calendar in the example above is shown below.
|
Period Name |
Period Start |
|---|---|
|
DayShift |
07/08/2026 06:00 AM |
|
NightShift |
07/08/2026 06:00 PM |
|
DayShift |
08/08/2026 06:00 AM |
|
NightShift |
08/08/2026 06:00 PM |
|
DayShift |
09/08/2026 06:00 AM |
|
NightShift |
09/08/2026 06:00 PM |
|
DayShift |
10/08/2026 06:00 AM |
|
NightShift |
10/08/2026 06:00 PM |
|
Day |
11/08/2026 06:00 AM |
|
Day |
12/08/2026 06:00 AM |
|
End |
13/08/2026 06:00 AM |
A final "dummy" row is required to define the end of the last period – it won’t be an actual period in the scheduling calendar.
Calendar preview
The calendar preview displays all periods and their associated attributes from the currently imported calendar.
-
Each represents a single period.
-
Each column shows a property of that period, such as:
-
Period Number
-
Period Name
-
Period Start
-
Period End
-
-
Any custom grouping fields you’ve defined
Two other columns, Duration in Hours and Duration In Days, are automatically generated. These are calculated as the time difference between the start of the current period and the start of the next.
|
Period Number |
Period Name |
Period Start |
Period End |
Duration in Hours |
Duration in Days |
|---|---|---|---|---|---|
|
1 |
DayShift |
07/08/2026 06:00 AM |
07/08/2026 06:00 PM |
12 |
0.5 |
|
2 |
NightShift |
07/08/2026 06:00 PM |
08/08/2026 06:00 AM |
12 |
0.5 |
|
3 |
DayShift |
08/08/2026 06:00 AM |
08/08/2026 06:00 PM |
12 |
0.5 |
|
4 |
NightShift |
08/08/2026 06:00 PM |
09/08/2026 06:00 AM |
12 |
0.5 |
Additional information
Refer to Calendar groupings for details on grouping calendar periods. Grouping is useful for combining scheduled slices under a shared label (such as Week or Month) when exporting activity areas, providing a way to reflect scheduling progress at an aggregated level.